Friday, October 16, 2015

More Changes to the Gyro


When I  changed the axle location, the rear struts were too long and caused each wheel to be toed in considerably, so I had to shorten them only a 1/2 inch.  I also moved the main axle from the lower tube that a previous owner had installed back to the keel.  This move put the gyro back to the original factory design.

In the first Photo above you can see the extra tube that I removed.  Not only was it made of steel and very heavy, it was also full of grass, gravel and dirt adding extra weight to the gyro.

The bottom photo shows the new axle alignment.  Please note that now it correctly angles down to the wheels as designed.

To trim additional weight, I also removed the fuel gauge sender and fuel gauge since the sender was malfunctioning any way.  This will require me to keep each flight limited by time in order to maintain a reserve.

Tuesday, October 13, 2015

Gear Box and Static Thrust RPM

I spoke with Leon Massa, owner of Compact Radial Engines, the Canadian Manufacturer of the MZ 202, (he is actually from Australia or NZ) today about the gear box on my engine.  My 62 inch prop is too short for my current gear box and turning too slow and not getting adequate thrust needed for taking off and climbing.

I am going to ship it to him and get it changed from a 3.11:1 ratio to 2.55:1.  He states that I should set the Pitch for 6120 RPMs static once I get the box back for optimum thrust.  It will likely be somewhere in the 9 to 10 degree range very similar to fellow Peach State Rotor Craft Air Command builder and pilot Gary Weaver's Rotax 582 with the same prop as mine, but, with what I believe is a 2.58:1 gear box.

Based on previous MZ 202 owners with the same set up,  that will get me above 310 lbs of thrust and more is possible with a longer prop. There are folks with the 3.11 box using 70" plus props on other applications getting over 375 lbs thrust with the MZ 202.  It has plenty of torque to get the job done and the gear box is apparently rock sold being used on Subaru EJ 22 and 25s with over 160 HP using adapter plates as well as big BMW conversions in Europe.

Here is a cut-away photo of the gear box from the factories website below:

Here are a couple of links to the gear box the second one shows the parts and a nice diagram of how it is set up:
http://www.compactradialengines.com/mzRZ.html (link is external)
http://www.compactradialengines.com/mzRZspecs.html (link is external)


I think that I am going to go ahead and remove the two aux fuel pods, fuel line, electric fuel pump, etc. to trim the weight back as much as possible.  Perhaps I will get a larger seat tank should I decide to go on longer flights later next year, depending on how well it climbs with just 5 gallons.  There are 7.5, 10 and 14 gallon versions available.

Monday, October 12, 2015

Air Command Weekend work

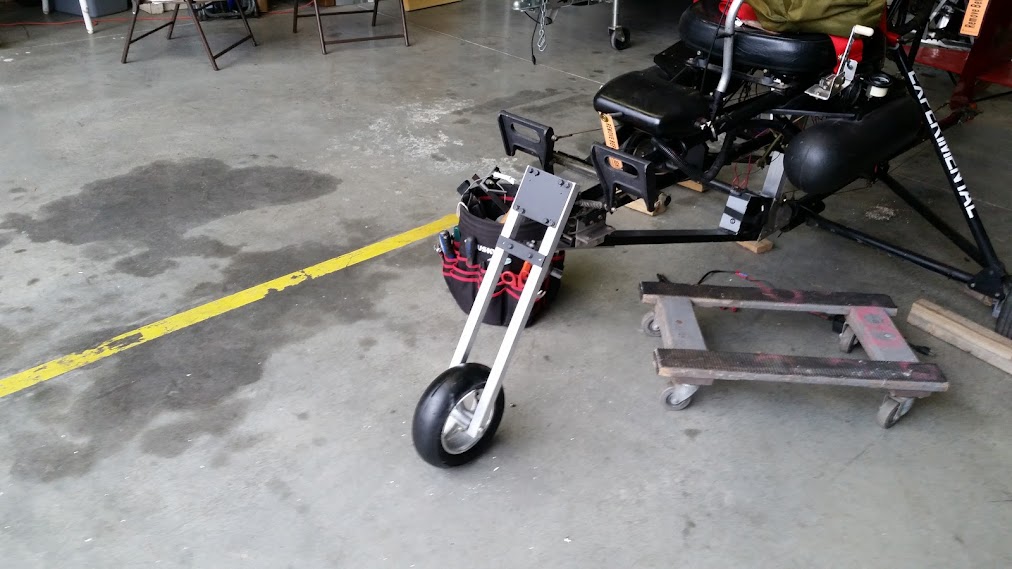
On Saturday, I finished the new nose gear assembly.

Today, I drilled and mounted the new Cheek Plates and Rotor Head.  Unfortunately, Gary's axiom that when you change one thing it affects 20 others is true.  Moving the rotor head forward causes the pre-rotator to hit the mast and hopefully with Jon's help, we can create a new mounting bracket for the pre-rotator and  move it to the side of the ring away from the mast.


I also mounted the instrument pod again and connected the control rods from the rotor head back to the scissor assembly.

Finally, I moved the main landing gear assembly 4.5 inches forward.  The nose weighed 85 lbs with me in the seat prior to the move, now it weighs 40 lbs, which will allow the nose to come up easier to balance on the mains while spinning the rotors up to  flying speed. I may stick to my previous method of not painting new aluminum parts and leave the new rear struts like they are pictured here.

The previous builder installed the extra tube below the keel and I may remove it as part of the weight reduction plan suggested by Scott Essex.

Thursday, October 8, 2015

Air Command Rebuild Photos

MZ 202 like the one on my Gyro
Hang Test before rebuild
Pod removed and new Mast installed

New instrument pod

Pod and mast removed.

Wednesday, October 7, 2015

Peach State Rotorcraft Club

This summer my job moved us to Georgia and I joined the Peach State Rotorcraft Club.  These guys are amazing, providing a great place to learn, build and fly gyros.

Here is a re-post from their forum for my gyro rebuild that I wrote on August 8th: 

With help from Gary and Kevin, the new cyclic control rods have been connected. However, there is little less stick movement to the right. It could be the slightly bent temporary cheek plates or a need for a minor adjustment in the rod length and or scissors.

Kurt gave me the idea to move the throttle forward, so yesterday I made an extension. It keeps my arm off the exhaust.

It has an electric fuel pump for transferring from the two saddle tanks to the seat tank. While replacing lines and the primer, I moved the line from the fuel pump line from the top of seat near the exhaust expansion chamber down under the seat.
I repaired the top of the rudder this weekend too.

The last thing I did this weekend was crank up the engine and taxi around the airport. Everything works! However, the brakes will not hold it still past half throttle. 

Posted on 9 Sep 2015:

I want to thank everyone for helping get the following accomplished!
Hang test 2.5 degrees forward
Weight 320 lbs with 3 gallons, blades will add another 50 lbs
Prop pitch is 15 degrees, Static RPM 5950, 270 LBS Thrust
Lewis and I fixed control yoke issue.
Jon is making the cheek plates.
I put the old front fork back on temporarily so my gyro can be moved while I'm gone for the next month. Inserting the round tube into the square for the new forks, even after grinding and sanding didn't go so well today. Danita and I got each piece about half way in and it just stopped. I will likely have to start over when I return in October and shave more off the round tube in order to get it all the way in. We tried heating the square tube with a heat gun and cooling the round with liquid air, nothing helps.

Once the cheek plates and new forks/front wheel are finished, the next task will be stringing and installing the blades. Then it will be ready for a test flight.


Posted 3 Oct 2015:

Today at Jon's recommendation, I used a belt sander to get the round tube to fit into the square tube for the new nose forks. I'm planning to go out to the hanger this week and put them on.

I found the bearings I need at a bike shop for the new front wheel. It requires a 10 MM axle or a coke can shim for AN 6 bolt currently being used. 

The next project will be drilling the new cheek plates. Then I will need to finish the upgrade for the pod mount. 

Hopefully, it will fly without modifying the main axle or removing the auxiliary fuel tanks, ect. to save weight.

Today's Post:

After further research and based on Bensen's minimum weight to thrust requirement of 2:1, 270 lbs. is not enough for my gross weight of 670 to 700 pounds.  I am spending $600 on the gear box to change it from 3.11 to 2.55, but, after talking to other MZ 202 owners. However, it will only get me to around 320 lbs. of thrust and I will have to reduce both the weight of the gyro and myself.


Tuesday, September 2, 2014

Gyrocopter Flight Training


After buying a Gyroplane I contacted Craig McPherson of Blues Skies Autogyros for training and took a week of leave from work.

This week I have flown for four hours so far in his MTO Sport trainer pictured above. It has been quite an experience and very different than the hour I spent with Steve McGowan in Georgia back in 2009.

The MTO Sport is very fast and responsive. Craig challenges his students by going beyond the typical syllabus. We have done the usual touch and go landings, but, rarely do we do them the same as done during the previous session. For instance, most CFIs use a powered approach and land the gyrocopter more like an airplane. Craig however, started me off with power off (engine at idle) approaches to simulate engine out situations.

At first the approaches were similar to a normal pattern with down wind leg, base leg and final. Then in a later session we started doing very short finals. Next we did an approach from a vertical decent, then a powered on standard approach.

More to follow, we are about to get back in the air and I will later describe the other training techniques that were incorporated with the touch and goes above.

Happy Flying,

Tom

Air Command Gyrocopter and Quicksilver MX II

Well folks, I decided to get back into aviation.  I have been considering purchasing a gyrocopter for some time.  My lovely wife Danita wants to fly with me and we had considered finishing a build on a two place tandem gyrocopter.  However, many in the gyrocopter sport have advised me to fly in a single place machine for at least one-hundred fifty hours before getting a two place machine.  Therefore, we decided to rebuild a two seat Quicksilver MX II (fixed wing) airplane that we could share.   This reduced my budget on a gyrocopter to a used single place machine and this is what I found, a center line thrust Air Command with an MZ 202 two-stroke engine.


Here is the MX II prior to the renovation that we are working on:

Currently, it is completely dis-assembled for repairs.  We are giving the engine a tune-up, by replacing the muffler, spark plugs, points and condensors.  We are also overhauling the carburetor.  Plus, we are replacing the wing covering material, modifying the stabilizer  and replacing the instruments.  Finally, to reduce weight, we are replacing the electric starter with a rope pull starter.